
When printing checks, you might encounter issues with page alignment i.e. QuickBooks Online Check Alignment Problems. This can occur both in QuickBooks Desktop and Online. There are a few things you can do to ensure that the paychecks are properly aligned, such as
- updating Adobe Reader
- Fixing data damage in the company file
However, if that doesn’t work, there are other troubleshooting methods you can try.
In this guide, we will explore various solutions to resolve QuickBooks Online check alignment problems. We have created different sections for both QuickBooks Desktop and Online in this blog. Therefore, navigate to the section that is suitable for your QB product and follow the instructions given there.
Let’s get started.
Section 1: Troubleshooting QuickBooks Online Check Alignment Problems
Let us see how to resolve check alignment problems in QuickBooks Online. We will do that by setting up printing preferences, aligning paycheck printing, and using the alignment grid.
1. Set Up Printing Preference
When you tweak the QuickBooks settings check alignment problems will be resolved most of the time.
- Click on the Gear (Settings) icon.
- Go to the Your Company section and choose Payroll Settings.
- Now, in the Preferences section, select Paycheck Printing.
- Select Preprinted QuickBooks-compatible voucher check stock.
- Choose how many stubs you want to print.
- Select OK.
However, if you still see QuickBooks Online check alignment problems, continue to the next step.
2. Save the Check as a PDF
QuickBooks Online uses a default browser when previewing. Therefore, you should save the vendor check as a PDF before opening it with Adobe Acrobat Reader.
Here is how you can do that:
- Tap on + New and choose Print Checks.
- Choose the checks you want to print and select Preview and Print.
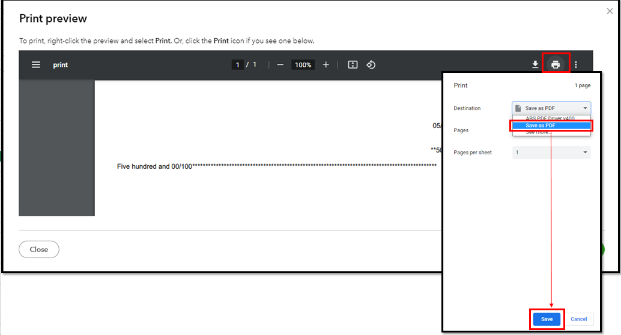
- Tap on the printer icon. Click on the Destination dropdown menu, and choose to Save as PDF.
- Choose Save.
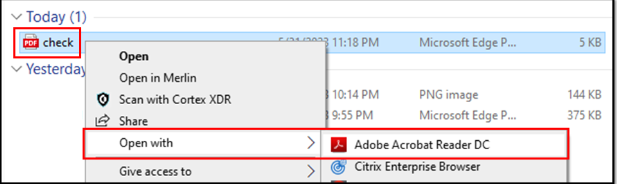
- Find the saved PDF and right-click on the file.
- Choose Open, followed by Adobe Acrobat Reader DC.
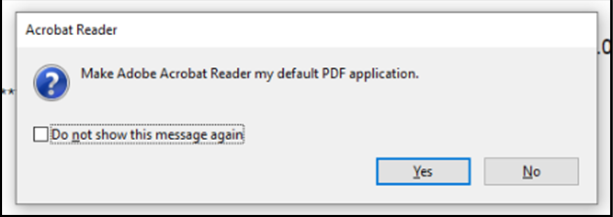
A prompt will show you how to select Adobe Acrobat Reader as the default PDF application. Choose Yes and follow the instructions you see on the screen.
3. Align Paycheck Printing
Next, we will let us go ahead and learn how to align paycheck printing in QBO.
- Open Settings and choose Payroll Settings.
- Go to the Printing field and choose Edit.
- Now, tap on Paycheck on QuickBooks-compatible check paper.
- Choose Print paycheck and 1 pay stub or Print paycheck and 2 pay stubs.
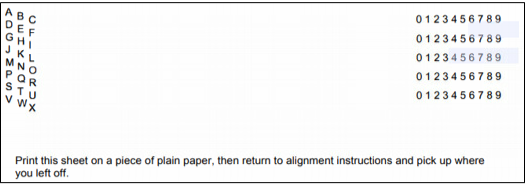
- Click on Align check and choose Print alignment form. This will print a sample check.
- Now, carry out what is instructed, and once you are done, close the window.
Here is how you can adjust the alignment:
Let’s say the letter K and number 5 are the current settings in your Printer setup preference. Here is what you can do when you print the sample check and find the information is too
High: Press a letter that comes after the letter K ( anything from L to X). This will move the info down.
Low: Press a letter that comes before the letter K ( anything from A to J). This will move the info up.
Far-left: Press a number that is more than 5 (anything from 6 to 9). This will move the info to the right.
Far-right: Press a number that is less than 5 ( anything from 0 to 4). This will move the info to the left.
- Choose Save followed by Done.
Now print a sample paycheck:
- Click on the Settings (gear) icon.
- Tap on the Payroll or Workers menu.
- Select the Employees portion.
- Now, under the Run Payroll section, choose the Paycheck List.
- Find a paycheck and select it.
- Choose Print.
Now, print a sample check and verify if the alignment is correct.
4.Use the Alignment Grid
You can use the Alignment Grid, which allows you to perfectly adjust the vertical settings and the position of printed text on the checks.
One thing you can do is to choose Voucher (8 1/2″ x 11″) as the check style to ensure the check will fit within the envelope.
- Click on the File menu in the top menu bar and click on Printer Setup.
- Choose the Form Name drop-down menu and click on Check/Paycheck.
- Select Voucher in the check style.
- Tap on Align.
- Now, click on Print Sample and compare it to the pre-printed checks.
- Use the grid on the sample and adjust the vertical and horizontal settings.
- Now, click on OK.
- Choose Align again and print another sample.
- Compare the sample to the paycheck stock and check if you need to make adjustments again.
Repeat these steps until you are satisfied with the alignment.
Section 2 – Troubleshooting Check Alignment Problems in QuickBooks Desktop
In this section, we will see how to resolve QuickBooks check alignment problems in the desktop application.
1. Align Paychecks
QuickBooks Alignment Grid will help you align your paychecks and make vertical and horizontal adjustments.
Moreover, make sure to choose the check style as Voucher (8 1/2″ x 11″).
- Open the File menu and select Printer Setup.
- Click on the Form Name drop-down menu and choose Check/Paycheck.
- Select Voucher as the check style.
- Now, tap Align.
- Select Print Sample and compare this sample to the pre-printed checks.
- Use the grid on the sample to adjust the vertical and horizontal settings. Finally, select OK.
- Now, select Align again and print another sample.
- Match this sample with your paycheck stock and make the required adjustments.
Repeat these steps until you are satisfied with the alignment.
However, if you continue to see QuickBooks check alignment problems, let us update Adobe Reader.
2. Update Adobe Reader
- Here is how you can update Adobe Reader:
- Open Adobe Reader.
- Now, select the Help menu.
- Tap on Check for Updates.
The built-in PDF handler is currently unsupported for QuickBooks Online Payroll and Intuit Online Payroll. Here is how you can switch to the Adobe PDF handler:
- Go to the Firefox menu and choose Tools or Options.
- Select Options.
- Choose Applications.
- Modify the Portable Document Format (PDF) to Adobe Reader or Adobe Acrobat.
- Choose OK.
3. Repair Adobe Reader
If updating Adobe Reader didn’t resolve the issue, let us repair it.
- Close Acrobat/Reader and all open web browser windows.
- Click on the Start menu at the bottom left side of your screen.
- Click on Control Panel and select Enter.
- Choose Programs and Features.
- Tap on Acrobat or Adobe Reader, then Uninstall/Change.
- Now, in the Setup dialog box, choose Next.
- Choose Repair and tap on Next.
- Choose Install.
- When it completes, choose Finish.
Now, restart the PC. Open QuickBooks and sign into the company file. Attempt to print paychecks and see if you have QuickBooks check alignment problems resolved.
4. Run Quick Fix my File
Quick Fix my File resolves the company file issues that can give way to incorrect check alignment.
To run Quick Fix my File, you first need to download and install QB Tool Hub. Once done, follow the steps below:
- In the Tool Hub, go to the Company File Issues tab.
- Choose Quick Fix my File.
- Select OK to launch QuickBooks
5. Run Verify and Rebuild Data Utility
QuickBooks check alignment problems can arise due to data damage in the company file. To resolve that:
- Open the File menu and choose Utilities. Tap on Verify Data.
- When the process is complete, QuickBooks will show the different issues it found with the company file.
Now, rebuild company data.
- Open the File menu and choose Utilities. Tap on Verify Data.
- When you see the Rebuild has completed message, select OK.
6. Rename QBPrint.qbp File
You can try renaming the QBPrint.qbp file to resolve printing issues in QuickBooks Desktop (QBDT) Payroll. There is information about your printer configuration and form customization in the QBprint.qbp file.
When you rename the QBprint.qbp file, this will create a new file from the default settings. In this way, all customized settings are lost.
You can find the QBPrint.qbp file at these locations:
Windows 10 and newer: C:\ProgramData\Intuit\QuickBooks 20xx (20xx represents the version of your QuickBooks.)
Server 2012 and newer: C:\Program Data\Intuit\QuickBooks YEAR and C:\Users*remote user*\AppData\Roaming\Intuit\ YEAR VERSION\TSPrinterSettings
Note: You might have to enable the features of the display of hidden files in Windows to find them.
Now, let us guide you in renaming the QBPrint.qbp file.
- Right-click on the QBprint.qbp file (If you have multiple versions of QuickBooks Desktop installed on your computer, find the QBPrint.qbp file of the QuickBooks version you face an issue with.
- Choose Rename.
- Insert .old at the end of the file name (The new name should become QBprint.qbp.old).
- Open QB Desktop application.
- Tap on the File menu and choose Printer Setup.
- Now, click on any transaction in the Form Name list and select OK.
This will create a new QBprint.qbp file.
Alternatively, you can run the QuickBooks Print and PDF Repair Tool from QuickBooks Tool Hub.
You can also check this blog – QuickBooks Service Ending Notification 2024 – What To Do?
7. Fix Print Alignments of Continuous Feed Printers
To resolve QuickBooks check alignment problems, you can make the required adjustments as shown below.
a. QuickBooks Desktop for Windows
Let us see how to make coarse and fine alignment adjustments for QuickBooks Desktop for Windows.
I. How to make coarse alignment adjustments
- Open the File menu and choose Printer Setup.
- Select the Form name dropdown menu and choose the form you want to print.
- Click on the Printer type dropdown menu and choose Continuous (Perforated Edge).
- Tap on Align and select a template you want to use.
- Once done, click on OK.
- Now, tap on Coarse and select OK. This will print a sample form.
- Verify the pointer line QuickBooks printed in the sample’s center. Pick out the number that is closest to the arrowheads. In the Pointer Line Position field, type this number, and then click OK. QuickBooks may publish an additional example.
Important: However, when you select OK, if QuickBooks prints a third sample, there is something wrong with the sample test print. Double-check the printer settings, and do not adjust the printer manually.
- Note down the printer alignment position on the test form. This is for future reference.
II. How to make fine alignment adjustments
- Open the File menu and choose Printer Setup.
- Select the Form name dropdown menu and choose the form you want to print.
- Click on the Printer type dropdown menu and choose Continuous (Perforated Edge).
- Tap on Align and select a template you want to use.
- Once done, click on OK.
- Now, tap on Fine and select OK. This will print a sample form.
- Verify the alignment grid that the sample QuickBooks prints. Calculate the text’s approximate movement.
- To indicate how much and which way to move the written text on the form, enter a number in the Vertical and Horizontal fields.
- When you find the fine adjustment settings correct, tap on OK.
- Now, choose OK to close the Printer Setup window.
b. QuickBooks Desktop for Mac
- Here is how to adjust the alignment of the text on a form on QB Desktop for Mac.
- First, open the form for which you want to adjust the alignment.
- Choose Print.
- Tap on Show Details if you are not able to see the details.
- Choose the Alignment tab.
- Now, move the block box and make the required adjustment to the alignment.
- Verify the text alignment in the print preview and ensure it is correct.
Now, tap on Print to check the alignment.
Conclusion
This guide explains how to resolve QuickBooks online check alignment problems in both the desktop application and the online version. Please follow the steps and instructions carefully and in the order they are written.
However, if you run into an issue or the problem persists even after carrying out these comprehensive solutions, speak to QB ProAdvisor. They are the experts when it comes to QuickBooks accounting.
Frequently Asked Questions
To correct a check alignment in QB Desktop, go to the check image window. Now, drag the grid so the numbers are in the same place they appear on your sample print. QuickBooks will automatically adjust the alignment.
To change the layout in QB Desktop, tap on the Checks tab and choose Print Setup. Click on the Check Style drop-down menu and choose the layout you want to use.
To align the text in QB Desktop, adjust the alignment of the text on a form.
Open the form for which you want to adjust the alignment.
Choose Print.
Tap on Show Details if you can’t see the details.
Click on the Alignment tab.
Drag the block box and move it to make the adjustment to the alignment.
Verify the text alignment in the print preview and ensure it is correct.
Here is how you can resolve the display issues in QB.
Close QuickBooks Desktop.
Launch the Start menu.
Enter QuickBooks into the search bar. Right-click on it and choose Open file location.
Now, find the QuickBooks.exe file right-click on it. Choose Properties.
Tap on the Compatibility tab.
Mark the checkbox for Disable display scaling on the high DPI settings.

Lara Newman is a seasoned Cloud and QuickBooks Expert with a robust three-year tenure at A2 Cloud Hosting Services. Her expertise encompasses a broad range of cloud computing solutions, with a special focus on integrating QuickBooks into diverse business environments. Lara’s dedication to optimizing operational efficiencies through cloud technology has been instrumental in driving digital transformation for numerous clients. Lara continues to be a pivotal asset to the company, leading the way in cloud services excellence.


